No Date In Finder For Mac High Sierra
Mac won’t start after upgrading to macOS High Sierra Reset NVRAM So you have successfully installed macOS High Sierra, but for some reason, your Mac won’t boot up.
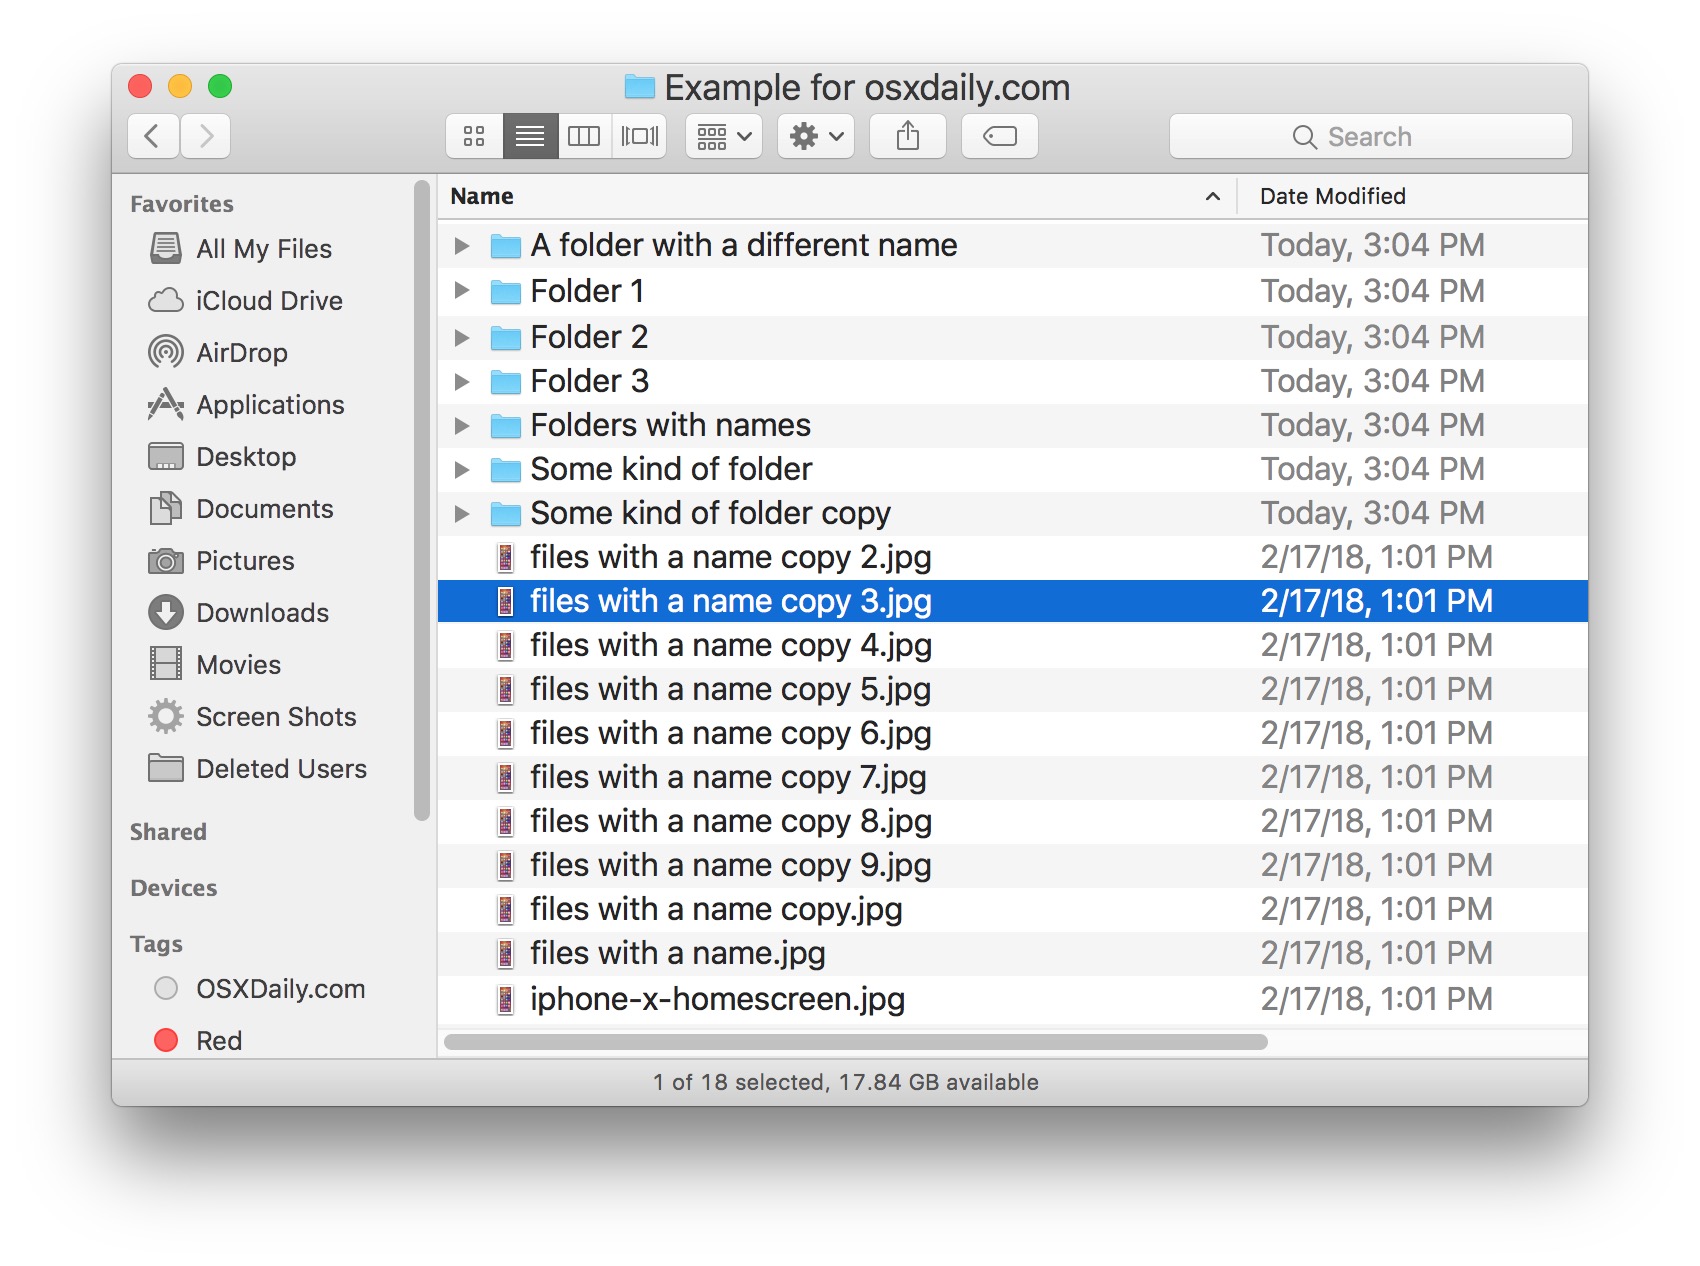
Tuesday, December 12th, 2017 Author: The Finder is the operating system’s default file manager for viewing and working with the Mac’s filing system. It allows us to easily see and work with the hierarchical organizational structure inherent in our Macs. To help us easily find, access, and organize our files, the Finder offers four different methods of viewing the filing system. In these two guides, we’re going to look at each of the four viewing options: Icon, List, Column, and Cover Flow; the viewing options that are available for each view, and some of the quirks and characteristics of each. We’ll start with Icon and List view, two of the most often used views.
In Customizing Finder Views: Part 2, we’ll look at the ins and outs of Column and Cover Flow views. Icon View To set the current Finder window to display items as icons, select Icon from the window’s toolbar; it’s the first button in the View section of the toolbar.
You can also select View, As Icons from the Finder menu bar. How to protect and scan your google chrome for yor mac and iphone from adware and birus. (You can select Icon view directly from the toolbar using the Icon view button outlined in red.) Icon view is the default Finder view, and is characterized by the use of icons to represent the items contained within a folder, usually files and other folders although other item types could be present, such as various types of links. The icons can be plain default images supplied by the operating system, or to bring a bit of color and style to the desktop. Icon Options Icon viewing options are available whenever a Finder window is the front most active window, and the Finder window is set to Icon view. To change the icon options, select View, Show View Options from the Finder menu bar, or press the Command + J keys. The View options window will open, displaying the various icon viewing options. (Icon view options allow you to customize many aspects of this popular Finder view.) Always open in icon view: When selected, the current folder will always open in icon view.
If deselected, the folder will open in whatever the previous view setting was. Browse in icon view: When selected, the Finder will apply icon view to any subfolders within the current folder as you browse through them. Arrange By: This dropdown menu lets you; the options include by name, kind, and date. The Arrange By option also interacts with the Sort By option. You can use them together to control the sorting order within an arrangement of items. For instance, when you arrange by kind, which will gather all images together, apps together, and documents together, you can then use the Sort By option to have the items within each group sorted by name, date, and size.
How to use hidden paint app on Mac: Open Markup Toolbar Preview's most commonly used tools are related to ways of viewing and sharing images: zoom, rotate and so on.  Paintbrush is an open source application, and a number of derivations are available in the Mac App Store, where some more modern-looking Microsoft Paint-like apps, such as one called Patina, can also be found. Pixen is another middle-of-the-road application. It’s billed as a “pixel editor”, and a “more powerful version of Paint, or a simpler Photoshop”. Well, let’s just say it isn’t as fun as Paint. It’s really an app for pixel artists, and there’s not much you can do with it if you just want to open a canvas and start drawing a stick man. Download Paint for macOS 10.6.6 or later and enjoy it on your Mac. 9.99$->4.99$-----50% off sale for a very limited time!!! Paint is a beautiful graphics painting app that provides basic drawing tools like MS Paint. In fact, there’s a hidden paint program on your Mac computer that has been sitting right under your nose this whole time, and a recent pose will show you how easy it is to find.
Sort By: Offers a number of sorting options, including name, date last opened, size, and tags. In addition, if Arrange By is set to none, you can use Sort By to force icons to snap to an invisible grid. Icon size: Use this slider to reduce or enlarge the icon size. You can select from 16×16 to 512×512 pixels. Grid Spacing: Use this slider to adjust the spacing between icons. Text size: Use the dropdown menu to set the font size of the item name. Label Position: You can set the item’s label to appear at the bottom of the icon or to the right of the icon.
Show Item Info: Selecting this option will display additional information about an object, such as the size of an image in pixels, the number of items in a folder, or the length of an audio or video track. Show Icon Preview: This option allows the icon for some file types to display a thumbnail preview of the file’s content.
Show Library Folder: This option is only available when the window is displaying the contents of the home folder, and you’re using OS X El Capitan or later. Selecting this option will allow the normally invisible user library folder to be displayed.
Background: You can select from three background types: White: This is the default. Color: You can select a color to use from the color picker that appears. Picture: You can select an image to use for the window’s background. The Best Use for Icon View Icon view has a few special features lacking in other views. The first is flexibility; you can arrange the icons any which way you like.
This is similar to how a real desktop behaves, allowing you to pile items around the desktop anywhere you want. (You can use the option to color the background to make one or more folders more easily identifiable.) If you need a bit of guidance to keep the window or desktop a bit less cluttered, you can enable snapping to the grid, or occasionally issue a cleanup command that will temporarily rearrange the icons so they line up to the invisible grid. To do this, select View, Clean Up from the Finder menu.